How to make incredibly delicious homemade English muffins that are so much better than store-bought! Our surprisingly easy, no-knead recipe uses simple ingredients to create a light, airy texture and the nooks and crannies we love.
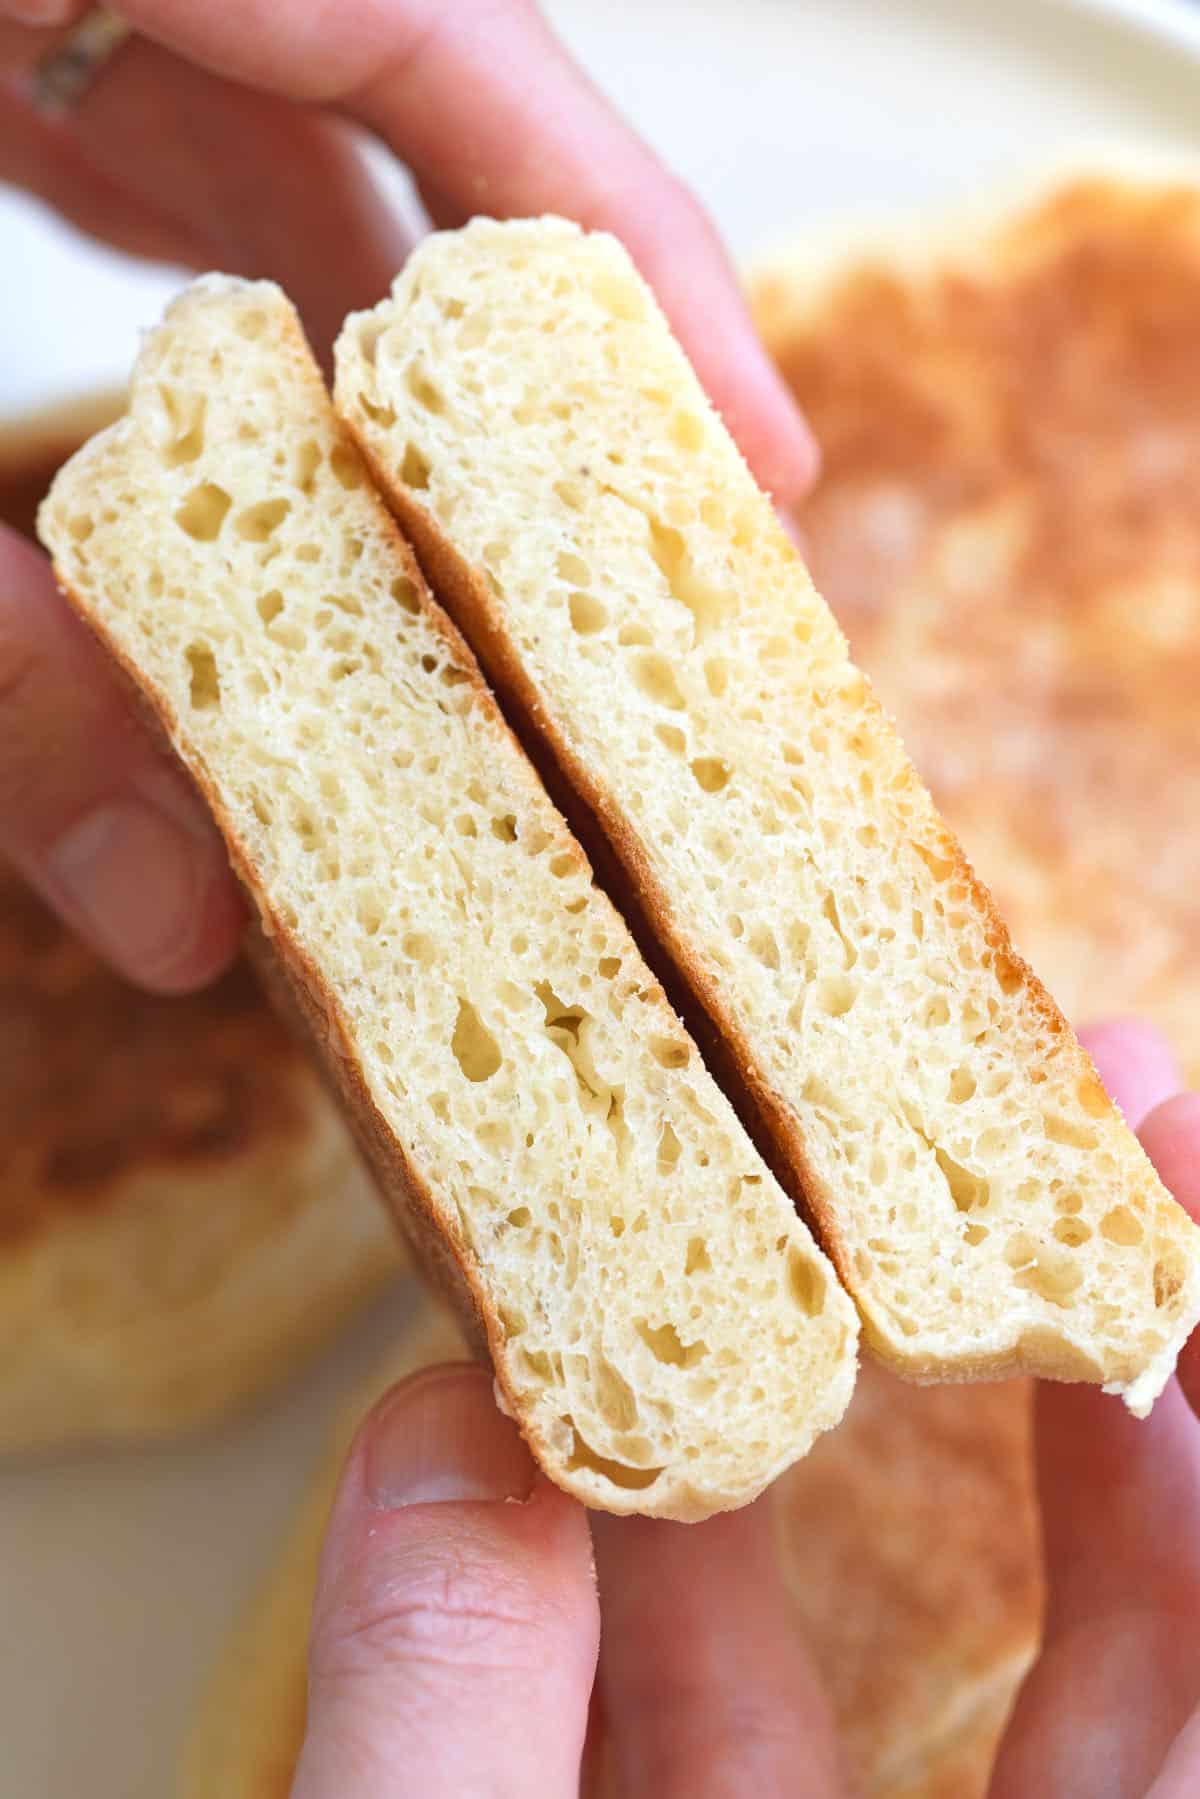
Our family goes nuts for this English muffins recipe. Whenever we make a batch, they are gone within days (the recipe makes 12). Homemade English muffins are the best! The process is fun, and the results are almost magical. So many nooks and crannies!
For the best flavor and texture, I slowly proof my dough in the fridge. I love this since I can make my dough one day, proof overnight, and then form and cook the next day. The overnight proof makes these much easier since I can break up the steps!
Key Ingredients
- Flour: I use all-purpose flour to make these English muffins and love how light and airy the final texture turns out.
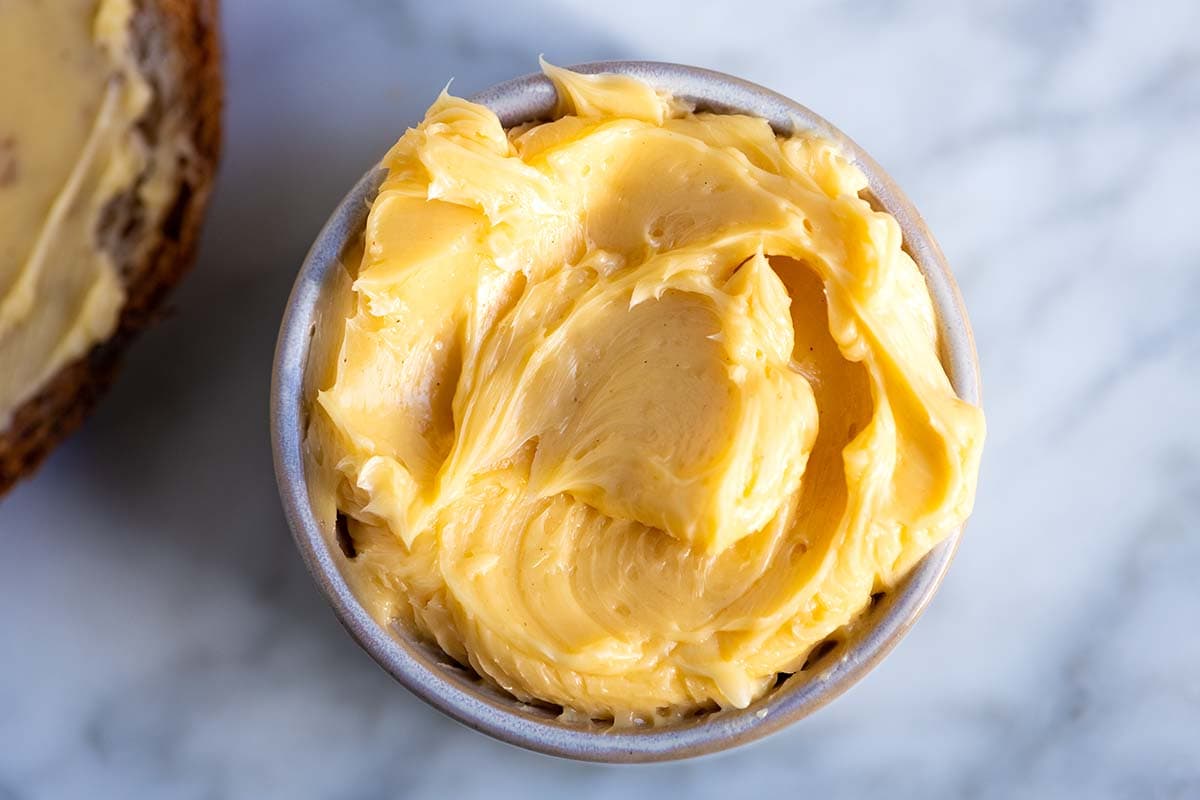
- Butter: I add melted butter to the dough, which makes our muffins more tender and taste incredible.
- Instant yeast: The recipe for making English muffins below works with active dry or instant yeast, but I find that instant yeast has a bit more pep, so that’s what I keep in my kitchen.
- Sugar: A bit of sugar (or honey) makes these taste amazing and helps wake our yeast so it starts bubbling.
- Egg: Adds richness to the dough. We add one egg.
- Sour cream: Makes them taste extra delicious. Many English muffin recipes call for milk, but we love swapping it for tastier, more tangy sour cream.
- Semolina flour: You will cook the English muffins on a griddle or in a skillet, so the semolina flour helps to prevent them from sticking. Cornmeal is a good substitute.
How to Make English Muffins
Our dough for these English muffins takes a while to proof. Don’t let that scare you, though. Breaking up the steps actually makes this recipe easier and more approachable (it also makes these taste amazing).
I find it easier to break this recipe into two days (to make this recipe in one day, see the tips below our recipe). On day one, you will make the dough. In a small bowl, combine your instant yeast with warm water and sugar, and then set it aside until foamy. If, after waiting for 10 minutes, you don’t see any bubbly action from the yeast, it is likely dead.
I make the dough in my stand mixer (it’s easier this way). Add the bubbly yeast mixture, egg, sour cream, melted butter, salt, and flour to the mixer and mix on medium-low speed until it begins to pull together.
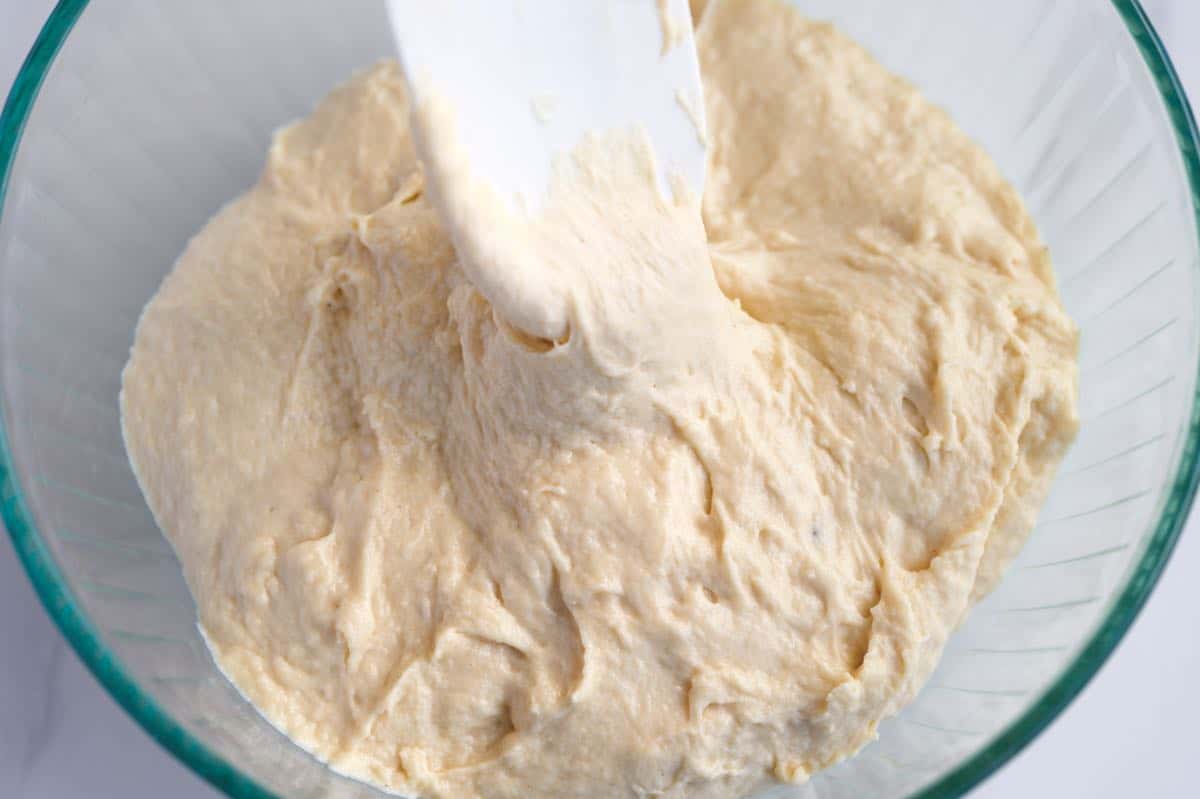
The dough will look very wet and slumpy, but this is a high-hydration dough, so don’t let its wet and sticky appearance scare you off. All the moisture in our dough helps to make the nooks and crannies!
You’ll continue mixing the dough for a few minutes, then scrape it into a large mixing bowl, cover it with plastic wrap, and refrigerate overnight. Remember, the dough is supposed to be sticky!

On day two, I form and cook the English muffins. Working with the cold dough makes things extra easy (it tames the stickiness). I don’t cut out the muffins. Instead, I roll pieces of the dough into balls and then press out using my fingertips until a 3-inch disc. Keep a bit of flour and semolina nearby to prevent sticking while working with the dough.
Place each formed dough disc onto a baking sheet lined with parchment paper and semolina flour, then proof for an hour. After an hour, they will have puffed up, and you can cook them!
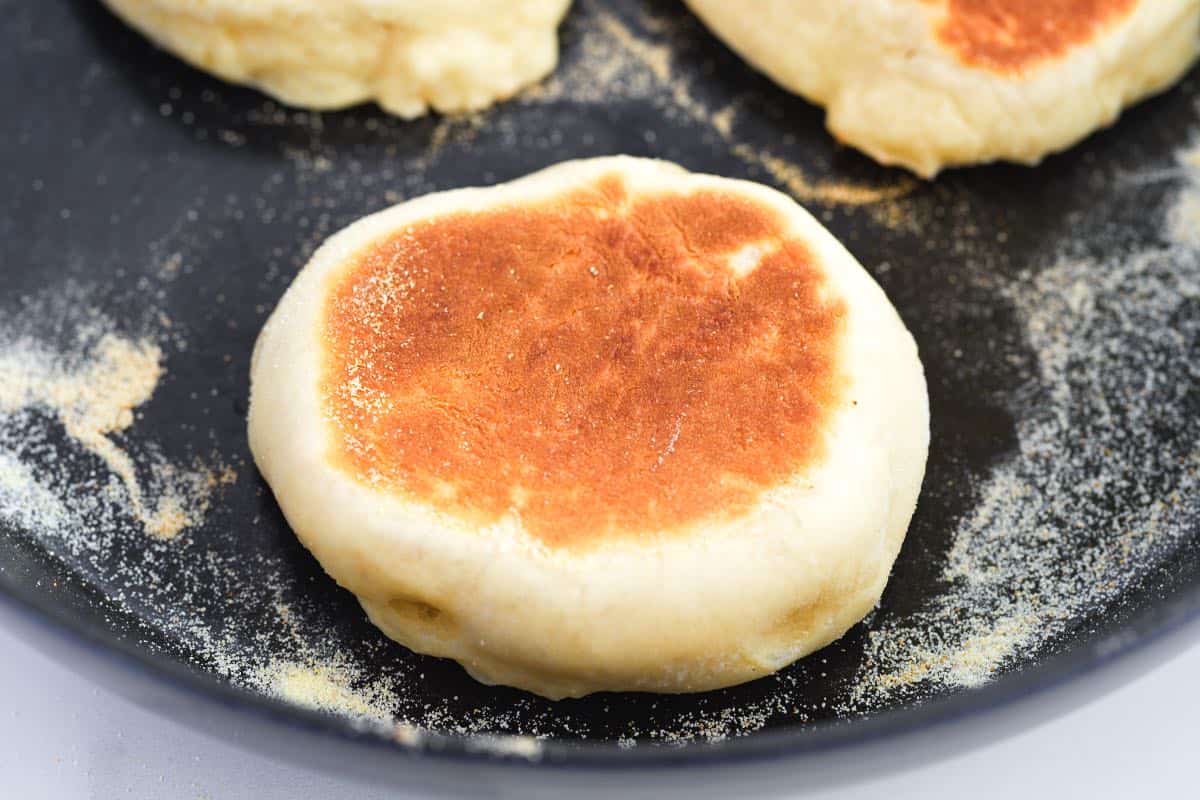
I cook my English muffins in a skillet over medium heat and then bake them in the oven for 15 minutes until the sides don’t feel doughy. And that’s it, perfect homemade English muffins. I know the steps seem long, but trust me, this recipe is really fun to follow, and the results are incredible!
My Favorite Ways to Use English Muffins
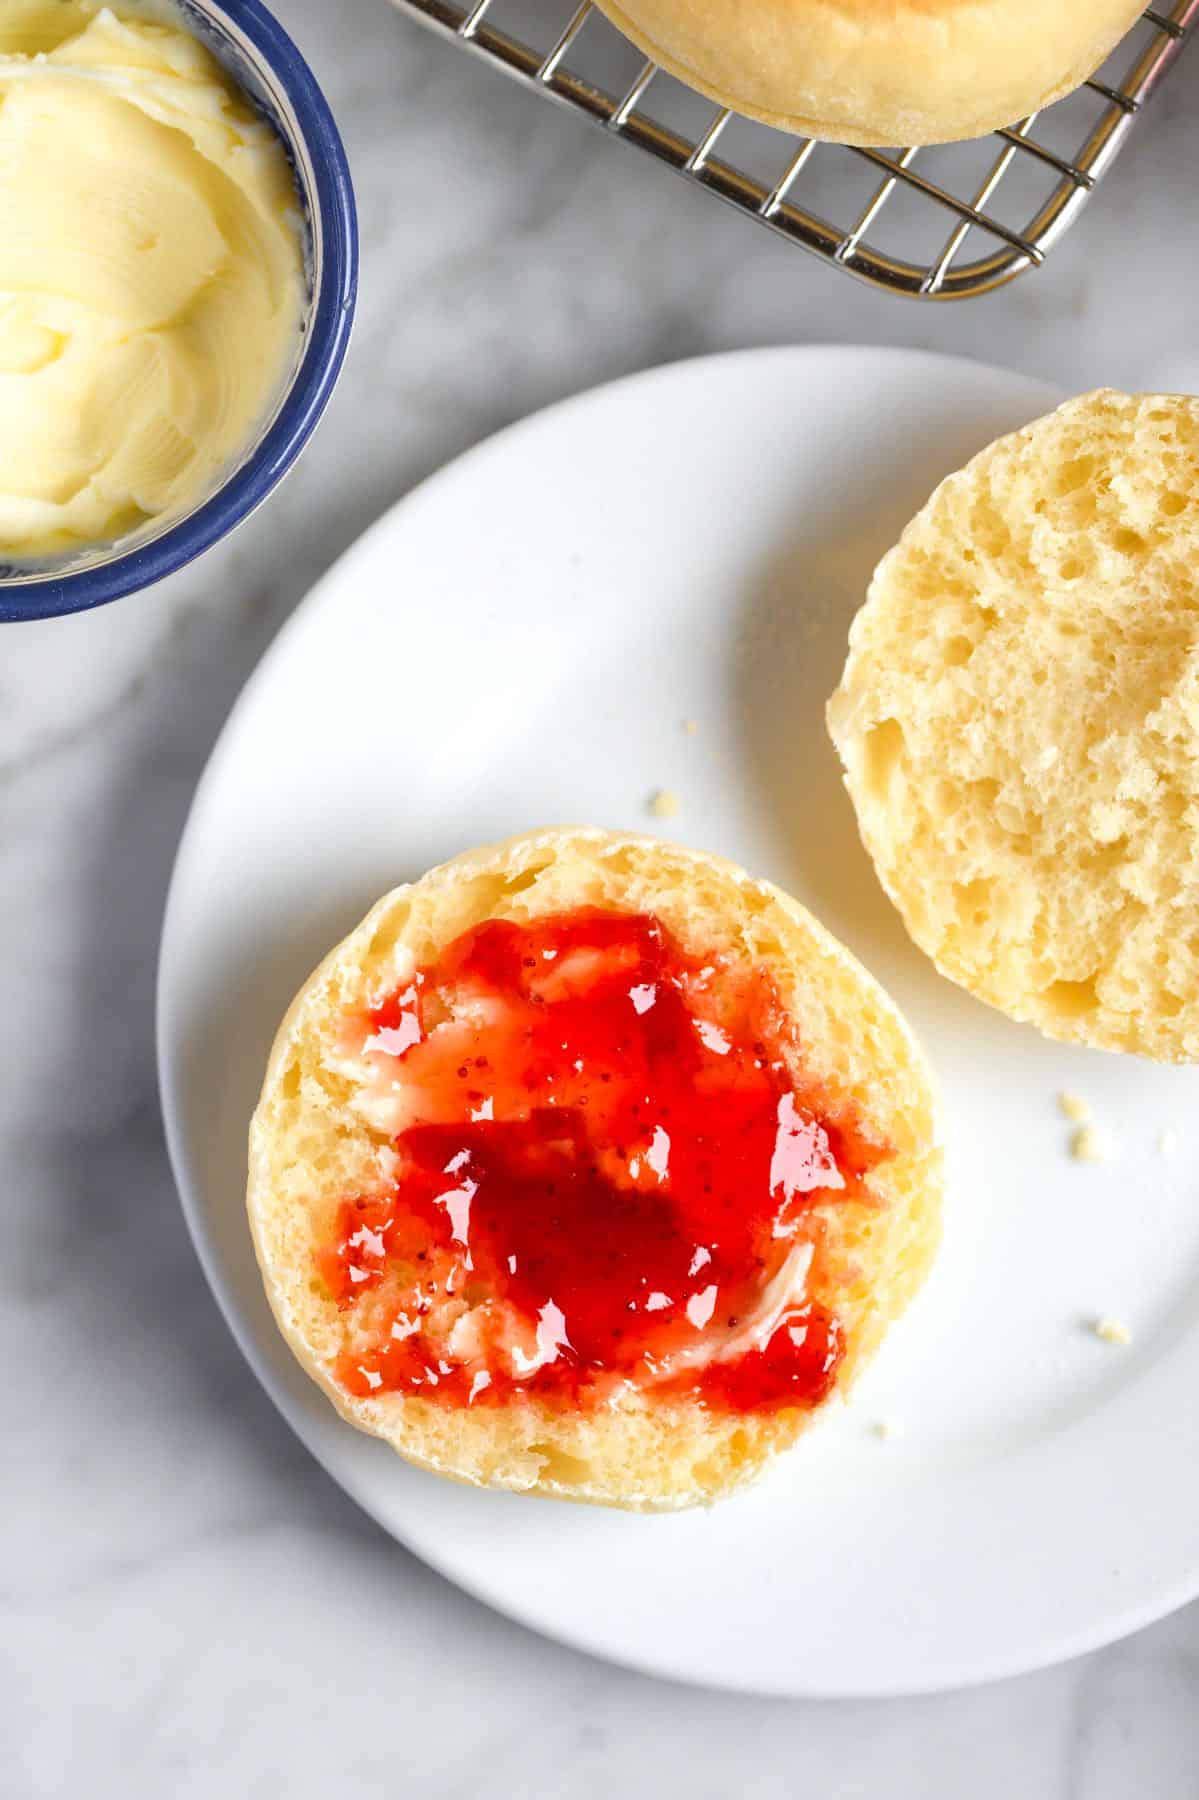
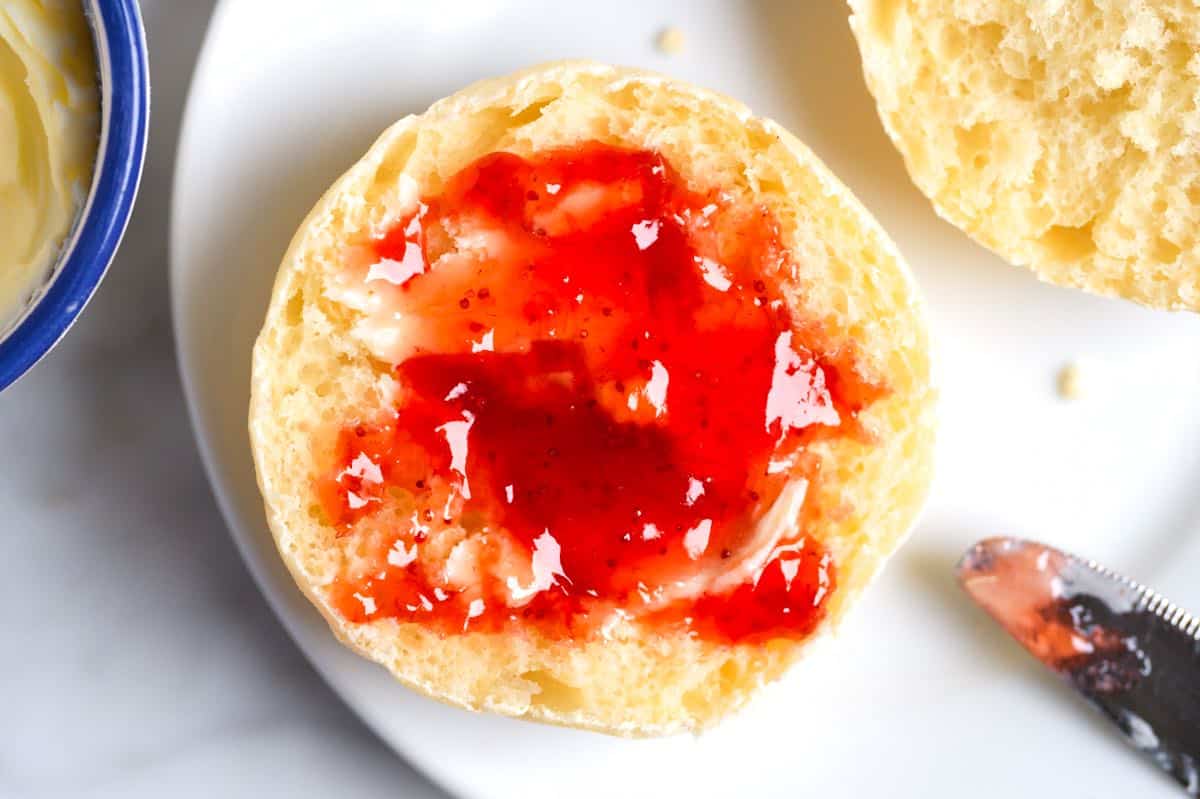
Our family loves toasting English muffins and serving them warm with butter, honey butter, jam, almond butter, or pumpkin butter. My son loves them for English muffin pizzas (add your favorite pizza sauce and toppings, then bake until bubbly).
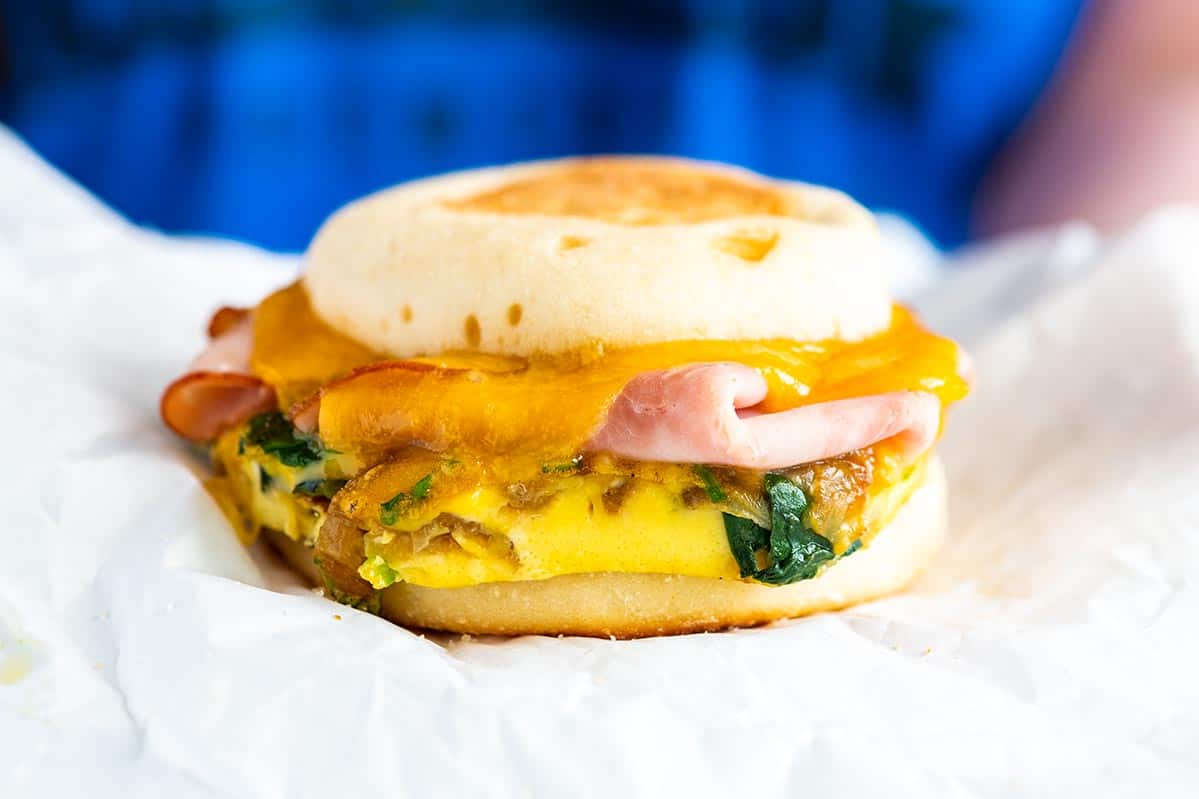
English muffins are the perfect base for Eggs Benedict (with Hollandaise sauce and poached eggs) or these homemade breakfast sandwiches. And I love swapping them in for sandwiches (I love using them for egg salad sandwiches and tuna salad sandwiches).
Perfect English Muffins
- PREP
- COOK
- TOTAL
With our recipe, you will make the best English muffins! The recipe uses simple ingredients to create a light, airy texture and so many nooks and crannies. I especially love the tangy flavor, thanks to the sour cream.
The dough takes a while to rise since we do it slowly in the fridge. This slow rise makes the English muffin dough easier to work with and the flavor vastly improves with the extra time. To make things easy, I like making my dough on one day, proof overnight in the fridge, and then form and cook the next day. See the tips below for how to make these in one day.
Watch Us Make the Recipe
You Will Need
2 ⅔ cups (305g) all-purpose flour
1 ¼ teaspoon (8g) fine sea salt
3 tablespoons (43g) butter, melted
3/4 cup (177ml) lukewarm water (110°F to 115°F)
2 tablespoons plus 1 teaspoon (30g) sugar or honey
2 ¼ teaspoons (7g) instant yeast, one 1/4-ounce packet
1 large egg, beaten
5 tablespoons (80g) sour cream
Semolina flour or cornmeal, as needed
Directions
- Make the Dough
1In the bowl of a stand mixer fitted with a dough hook, mix the flour and salt.
2Whisk together the water, sugar, and yeast in a small bowl. Let sit for 15 minutes until the mixture is bubbly and foamy. If it does not bubble, the yeast is dead (toss the mixture and try again with new yeast).
3Add the yeast mixture, melted butter, beaten egg, and sour cream to the flour in the stand mixer. Mix at medium-low speed until the dough begins to pull together, about 5 to 8 minutes. Scrape down the sides of the bowl occasionally. The dough will be very wet, slumpy, and sticky.
4Proof the dough: Transfer the dough to a large bowl, cover with plastic wrap, and refrigerate overnight.
- Shape the Muffins
1The next day, line a baking sheet with parchment paper and dust with all-purpose flour.
2Lightly flour your work surface. Then, without punching down the proofed dough, gently turn it onto the floured surface, flatten into a large circle, and then cut into 12 equal triangles.
3Form each piece into a ball (see how I do this in our video). Place onto the prepared baking sheet, then flatten it into a disk (around 3 inches in diameter). Make sure there is some space between each muffin.
4Proof again: Cover the baking sheet with a dish towel and let rise at room temperature for 1 hour and 15 minutes (or for 1 hour with your oven’s proof setting).
- Cook the Muffins
1Preheat oven to 350°F (177°C). Prepare a second baking sheet with parchment paper.
2Heat a heavy-bottomed skillet over medium heat. Dust with semolina flour and cook the muffins in batches until golden brown on both sides (about 3 to 5 minutes per side). I can fit 3 in my skillet at a time. Be careful when moving the muffins to the skillet. They will be a bit soft, but do it in a swift confident motion, and you should be okay (they might look misformed at first, but they puff back up).
3Transfer partially cooked muffins to the prepared baking sheet. Then, once you have 6 muffins on the baking sheet, bake for 10 to 15 minutes or until the sides feel firm. Baking 6 at a time helps prevent the partially cooked muffins from falling back on themselves as they wait for the rest to cook in the skillet. The idea is to get them into the oven as quickly as possible to firm up.
4Repeat the cooking process with the remaining dough and reuse the baking sheet you proofed the muffins on for baking the remaining 6.
5Cool cooked English muffins on a wire rack. Use a pastry brush to brush away excess flour from the outside of the muffins, and then store in an airtight container on the counter for up to 3 days (or freeze for 1 month).
Adam and Joanne's Tips
- Yeast: Use instant yeast or active dry yeast in this recipe. Directions are the same for both. I prefer instant yeast when making bread since it’s usually more active and bubbly.
- Measuring your flour: Fluff the flour in its container, then gently scoop it into your measuring cup until slightly mounded. Level off the top with a knife for accurate measuring. For even more accuracy, use a scale and measure the flour by weight (in grams).
- Serving: For the most nooks and crannies, don’t slice them, and use a fork to score around the middle of the English muffin instead. Then, gently pull the two halves apart with your fingers.
- Can I make these on the same day? To make these in one day, you can proof the dough at room temperature until doubled, about 2 hours. Then, place it in the refrigerator for at least 4 hours (it can be longer). From there, you will form the muffins and proof for another hour before cooking them. Chilling the dough develops flavor and makes it much easier to work with.
- Storing: English muffins last in an airtight container on the counter for up to 3 days, or you can freeze them for up to 1 month. To freeze them, line them up on a baking sheet and freeze until hard, then transfer to a freezer-safe bag or container.
- The nutrition facts provided below are estimates.


Followed directions to a T. Tasted spot on but my final proof they didn’t get that tall. My kitchen may not have been at a good temp for it to rise. I’ll attempt again!
I don’t normally leave reviews, but this recipe is awesome! I don’t have a stand mixer 🤦♀️ so I just used a little elbow grease and it worked great. I have made this twice already and both times I didn’t have sour cream in my fridge. I substitute the first time with cottage cheese and the second time with Greek yogurt both turned out delicious. 😊
Would the muffins still be OK if I cut the salt in half? Trying to reduce the sodium, but I think totally omitting the salt would make for a tasteless muffin.
Since you are trying to reduce salt intact, yes! You will lost a little flavor, but the muffins will still be lovely.
If I were to add sourdough discard to this, would I have to alter the amount og yeast at all? Thank you
Hi Nathan, I’m not sure! I haven’t worked with sourdough discard for these muffins before. I’m hoping someone else who is more knowledgeable about sourdough can comment. You also may have better luck with a sourdough specific recipe.
I just swapped the sour cream for sourdough start/discard worked perfectly fine
That’s great to hear! Thank you for sharing!
Can the sour cream be replaced by plain Greek yogurt?
We have only used sour cream, but yogurt should be fine!
I literally just made these tonight. I followed the same day recipe. PERFECT AND DELICIOUS. OMG my fave. Easy to make. I wanted to add pictures but didn’t see anywhere to attach pictures. Delicious Delicious thank you
Wonderful! Glad you loved them. We don’t have a way to upload photos yet. It is on our to-do list 🙂
These are fabulous! Can they be made with whole wheat flour?
So happy you loved the recipe! We haven’t tried whole wheat flour yet but it should work just fine.
Hi Adam and Joanne, Tried your English muffin recipe. I am NOT a baker. The flavor was delicious — however, the dough turned out super wet for me. You warned that the dough would in fact be wet, but it was unwieldy. I did add flour to the board, etc., but still difficult to maneuver. Question: How much flour can I add to the board/dough to maintain the integrity of the recipe? Thank you so much!
Hi Eva, I have added quite a bit without any issues to make the dough easier to work with if the dough is particularly wet. The chilled dough helps a lot. Use as much flour as you need to form the discs.
Did you try wetting your hands with cool water, keeping morewater nearby to re wet hands? .
Eva I left it in my mixer machine a bit longer and that helped me out. I also left it in the fridge longer. Ingredients were measured perfectly. Hope this helps
The first time a tried these muffins. They came out super nice, a very good taste and texture. Amazing!
Hi Joze, I am so happy that you gave our recipe a try! Glad you enjoyed them so much.
These were amazing! The instructions were spot on. The dough was pillowy soft and they tasted incredible. Don’t think I’ll be able to go back to purchasing English muffins ever again. Thanks!
We totally agree! We are thrilled that you loved them 🙂
So much fun to make and delicious. I have tried many of your recipes and have loved them all.
You have made our day 🙂
I just tried to make these and it doesn’t say whether the bowl you transfer the dough to is greased. When I took mine out of the fridge, the top of the dough was dry and the part touching the bowl was stuck. This just doesn’t seem right so I just threw it away. Can you please clarify on whether the bowl is supposed to be greased/oiled or not?
Hi Cindy, I am sorry the dough didn’t go so well for you. I do not grease the bowl before adding the dough. It does stick some to the bowl the next morning, but I just scrape most of it out (see video to see how my bowl looks). From your comment, it sounds like you did not cover the dough for the overnight proof? This is important (I use plastic wrap).
I did exactly what she did on the video – she didn’t grease the bowl and she covered hers with plastic wrap and mine turned out fantastic.
Hi Mary, so glad you loved them 🙂
I’ve got to try this recipie!!!
You are going to love it 🙂