This is the best pie crust recipe I’ve ever used! I’ve been using this recipe for flaky pie crust for over 10 years and haven’t looked back. Don’t miss the helpful video that walks you through every step for guaranteed success.
My favorite foolproof pie crust recipe guarantees perfect results every time. It’s so easy to roll out, and your pies will have a crust with the most wonderful light and flaky layers.
This easy recipe works beautifully for single or double crust pies, both sweet and savory. We recommend this pie dough for almost all the pie recipes on Inspired Taste. This is definitely a keeper!
Key Ingredients
- Flour: I use all-purpose flour in this pie crust recipe and get consistently great results.
- Cold Butter: You want to use very cold butter when making pie crust.
- Salt: Use salt, even when making pie crust for sweet pies. It makes the crust taste amazing.
- Sugar: Is optional, but if I’m making sweet pies or even a quiche, I use it. We only add a tablespoon, which doesn’t really make the crust taste sweet, its more for balancing the flavor of the flour and butter.
- Cold water: Use icy cold water when you make pie crust.
The Secret to the Best Pie Crust
The secret to making the best pie crust is to coat a portion of the flour with cold butter before adding in the rest of your flour. This simple step guarantees a super flaky, light pie crust. Gluten forms when you mix flour and water. We want some gluten for structure, but too much will make your crust tough, dense, and less flaky.
Our tried and true pie crust recipe mixes a portion of the flour with our butter first. You can think about it as if we are giving the flour a butter raincoat, which make it difficult for the flour coated in butter to absorb water. In other words, it helps prevent too much gluten development. Less gluten = flakier and more tender pie crusts.
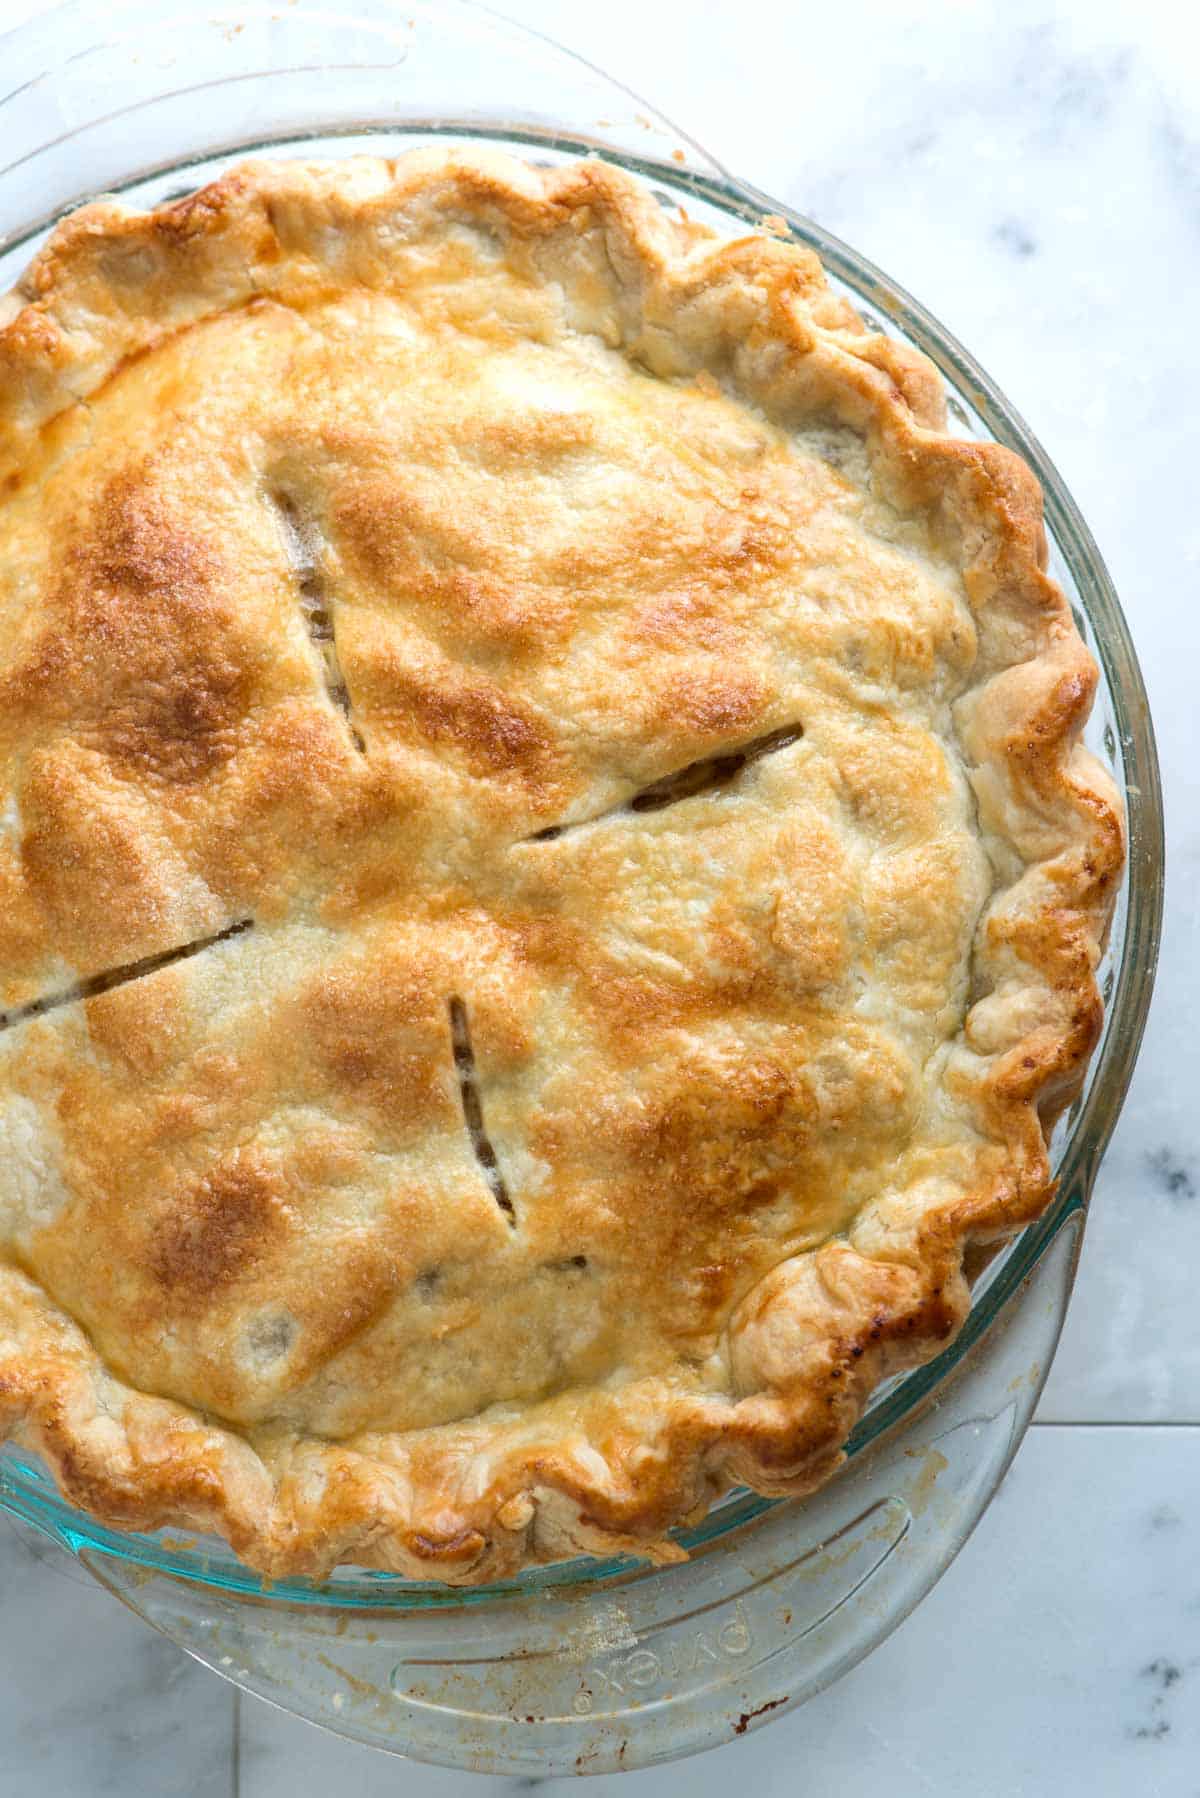
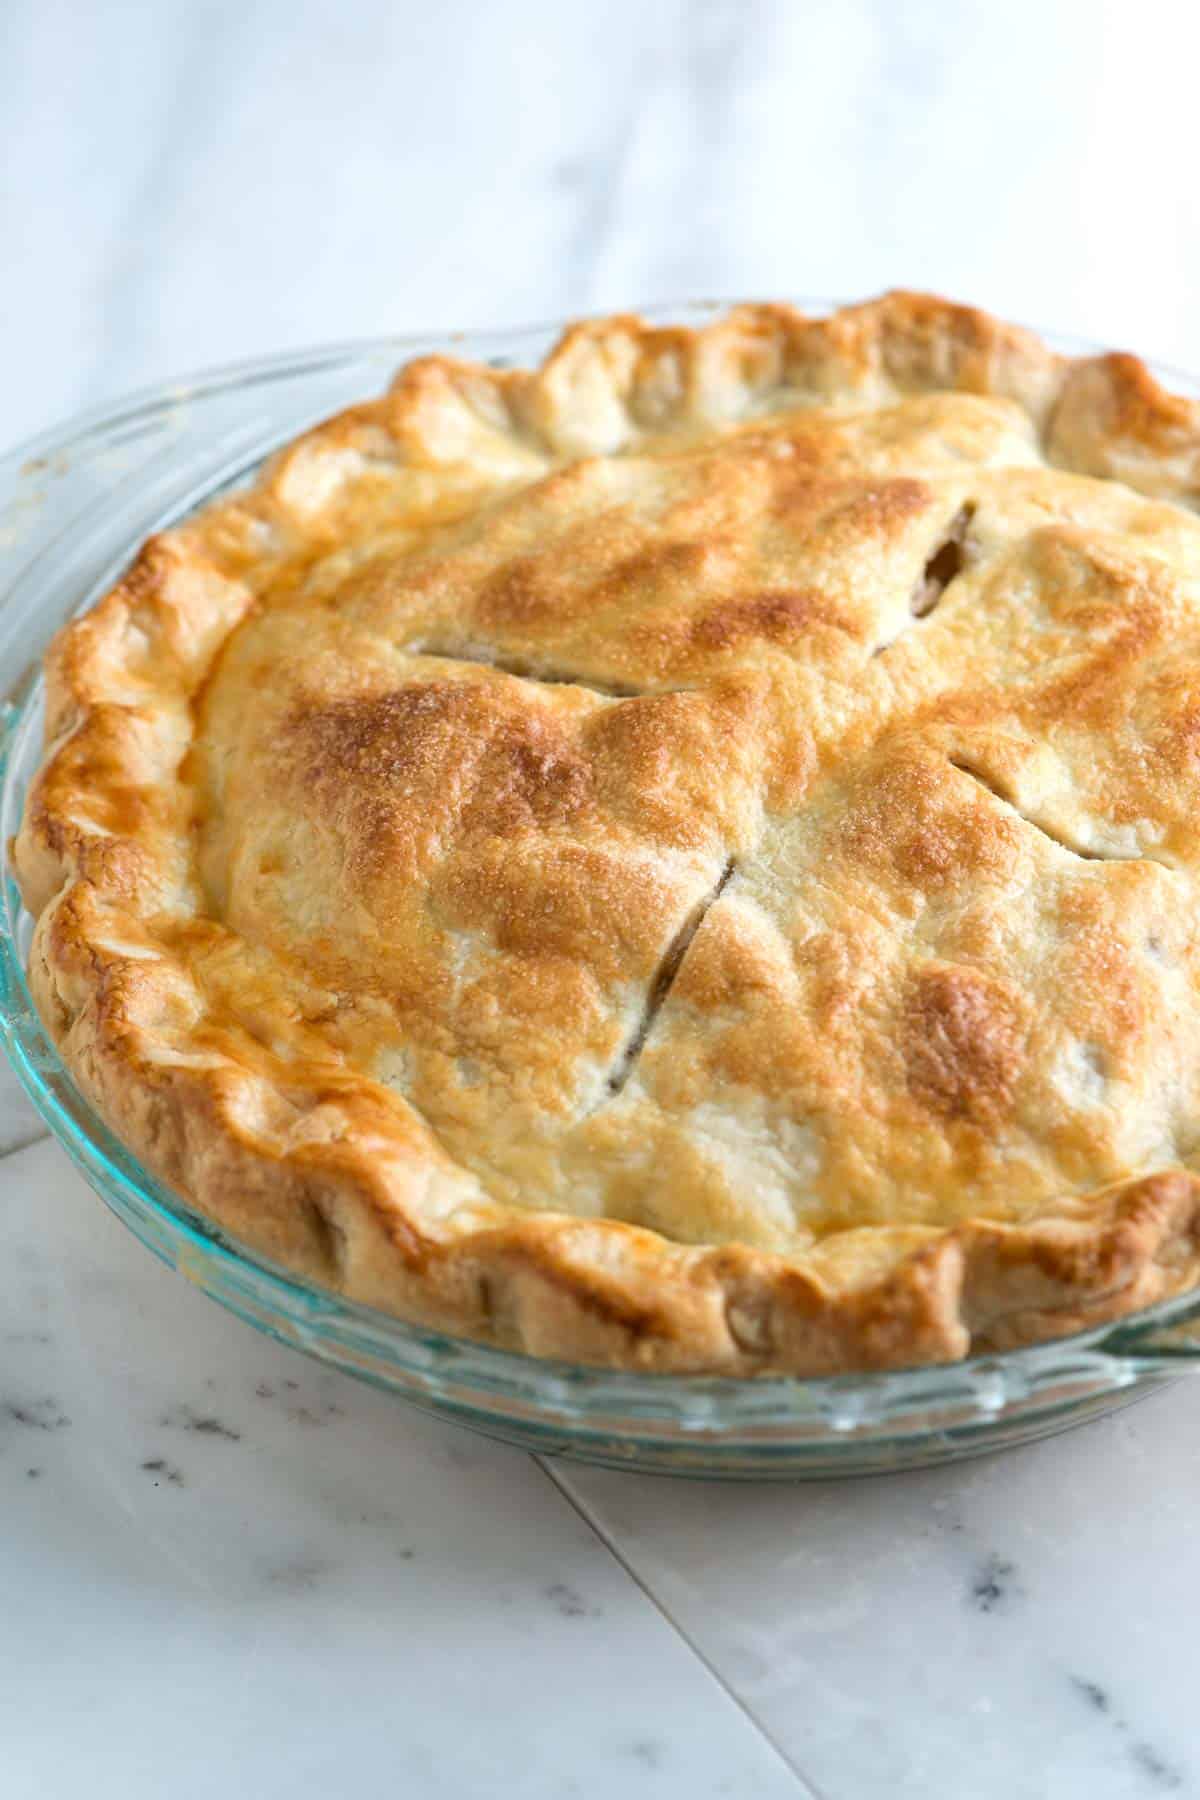
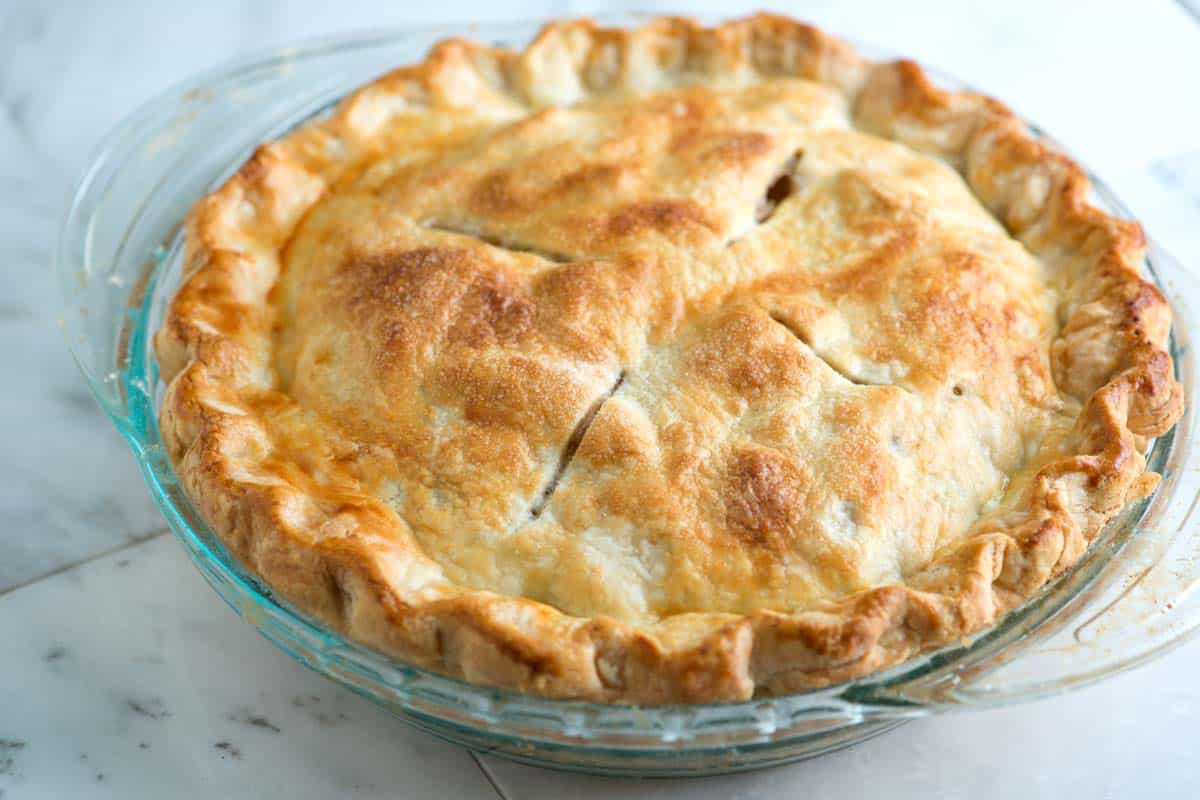
Great pie crust is light enough to flake and doesn’t turn soggy from juicy fillings. It isn’t crumbly. Instead, the crust is made of long, thin layers of dough (see photo).

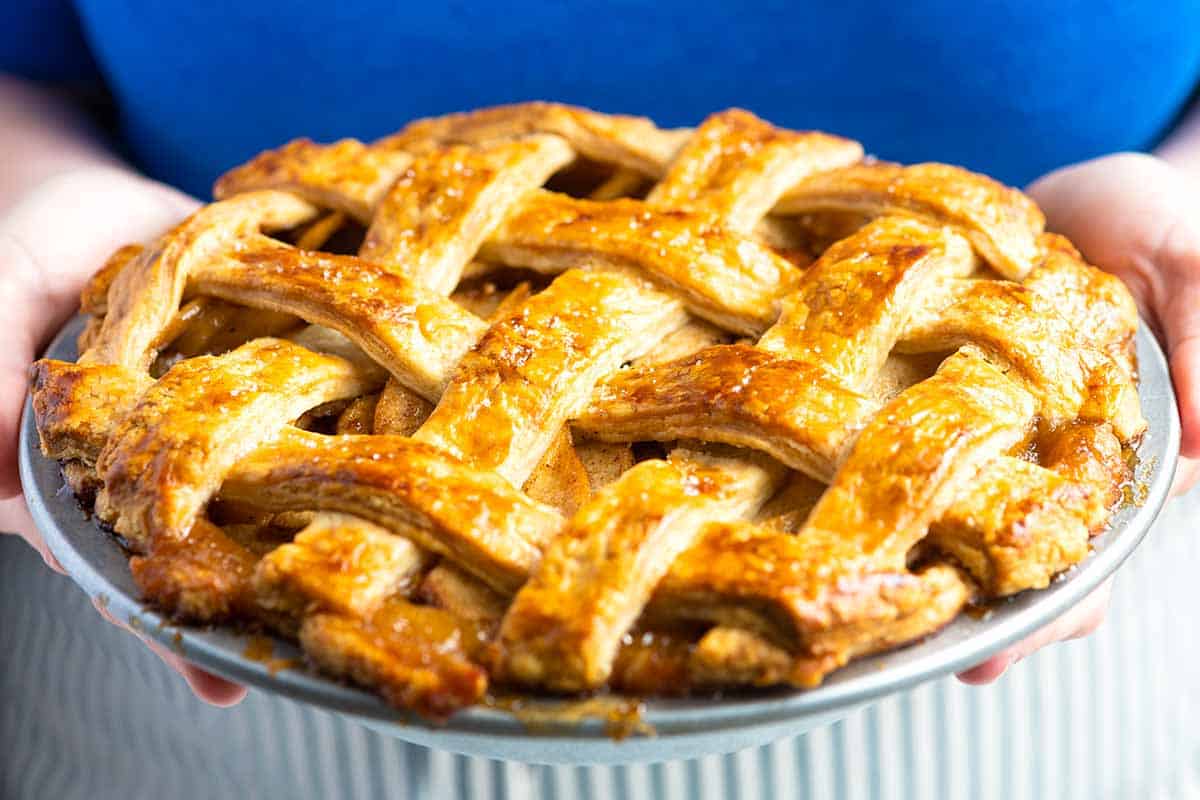
You can also see how amazing this crust is when looking at our recipe for apple pie with a lattice crust (the dough rolls out so nicely and makes it easy to add a beautiful lattice crust). Or look at this sweet potato pie. The bottom of the crust turns a beautiful golden brown and holds up so well against the wet sweet potato filling.
I learned this strategy of coating a portion of the flour in butter from Cooks Illustrated and Kenji López-Alt. I will be forever grateful!
How to Make Pie Crust
I use a food processor to make this pie crust. It’s quick and easy. Add a portion of your flour, salt, and sugar to your food processor. Pulse to combine, then add your cold butter.
You’ll process until the flour is well coated with the butter (the flour actually changes color). Watch me do this in the video, or look at the photo below. I can press the flour and butter mixture together.
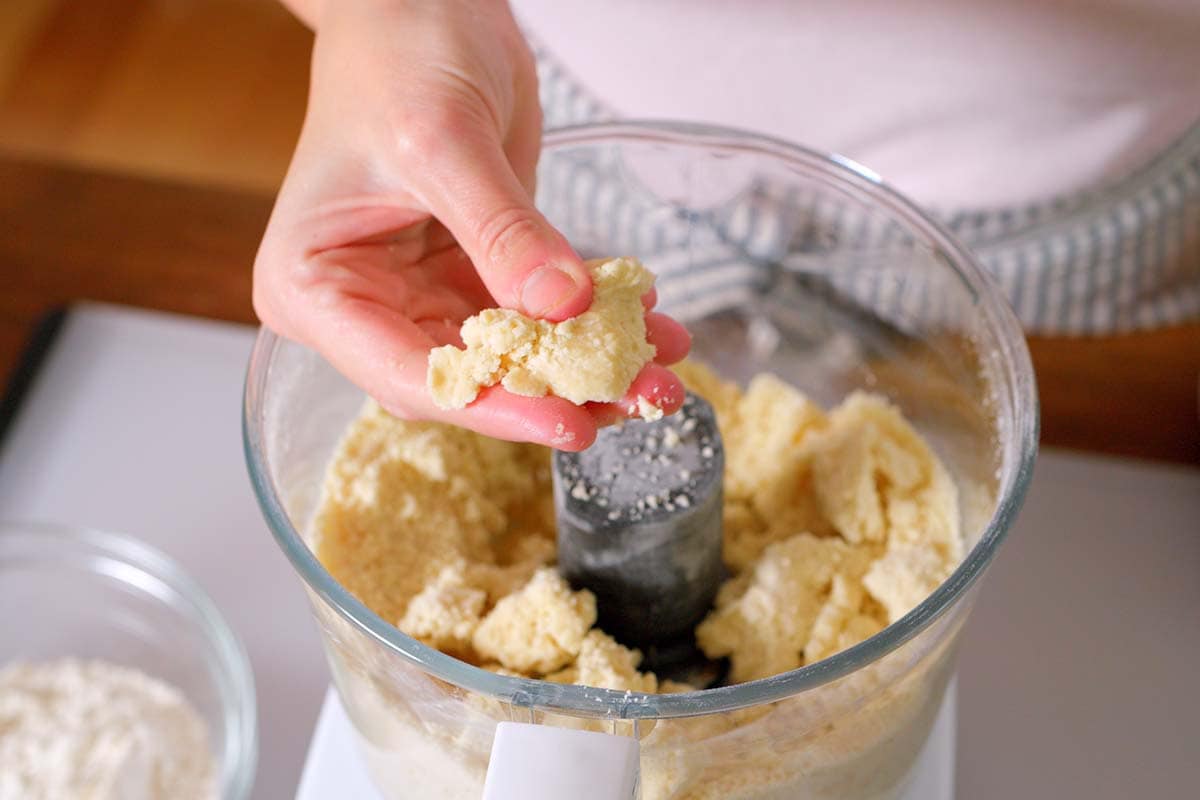
Now that the flour is well coated in the butter, you can pulse in the remaining flour until crumbly (it only takes a few seconds).
The last step is to bring the crust together using cold water. I do this by hand, scattering the cold water over a tablespoon at a time until the dough is wet enough to hold together (some crumbles are fine).
If you prefer to do all this by hand, you can! It will be just as easy to roll out and turns out super flaky. To make this pie crust by hand, we recommend using a pastry cutter to cut the butter into the flour (they are inexpensive and helpful for other recipes like biscuits and scones).
In our recipe video, we show making this recipe in a food processor and by hand using a pastry cutter. You’ll follow the same method as when we use a food processor. Combine a portion of the flour with your butter, and then add the remaining flour and water.
Easy Pie Recipes
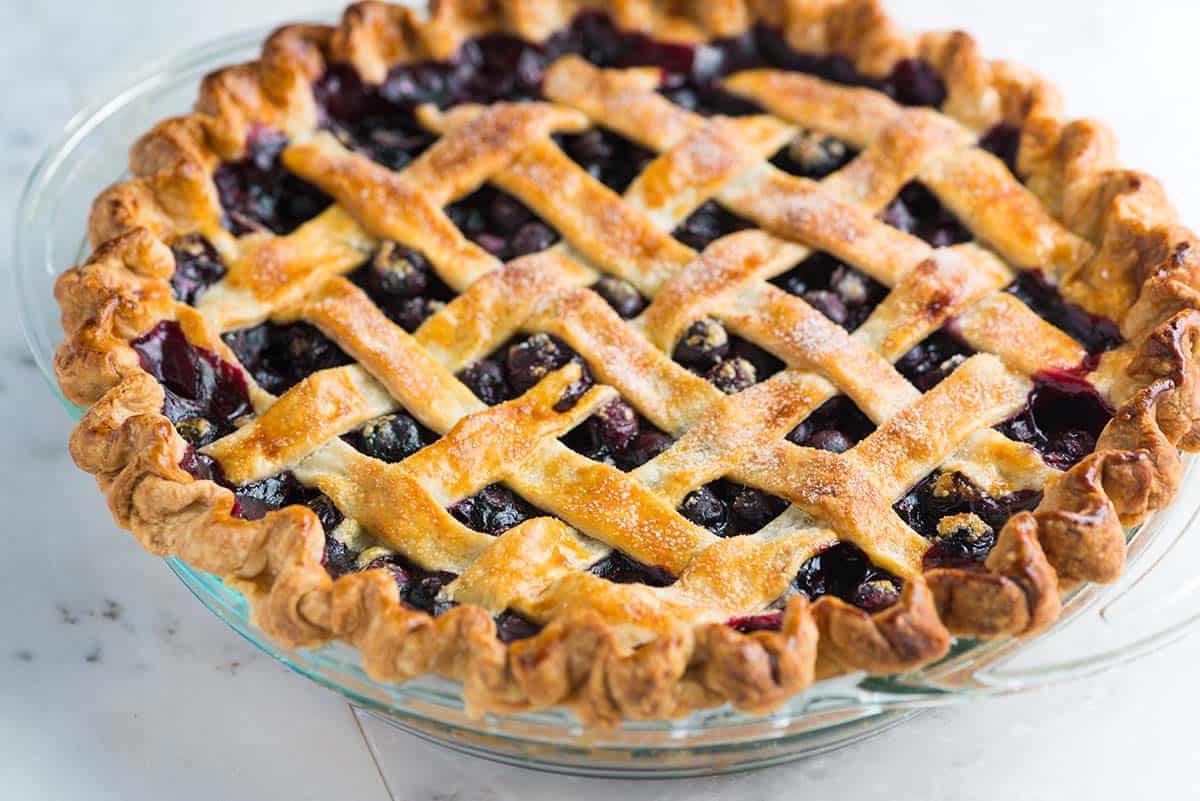
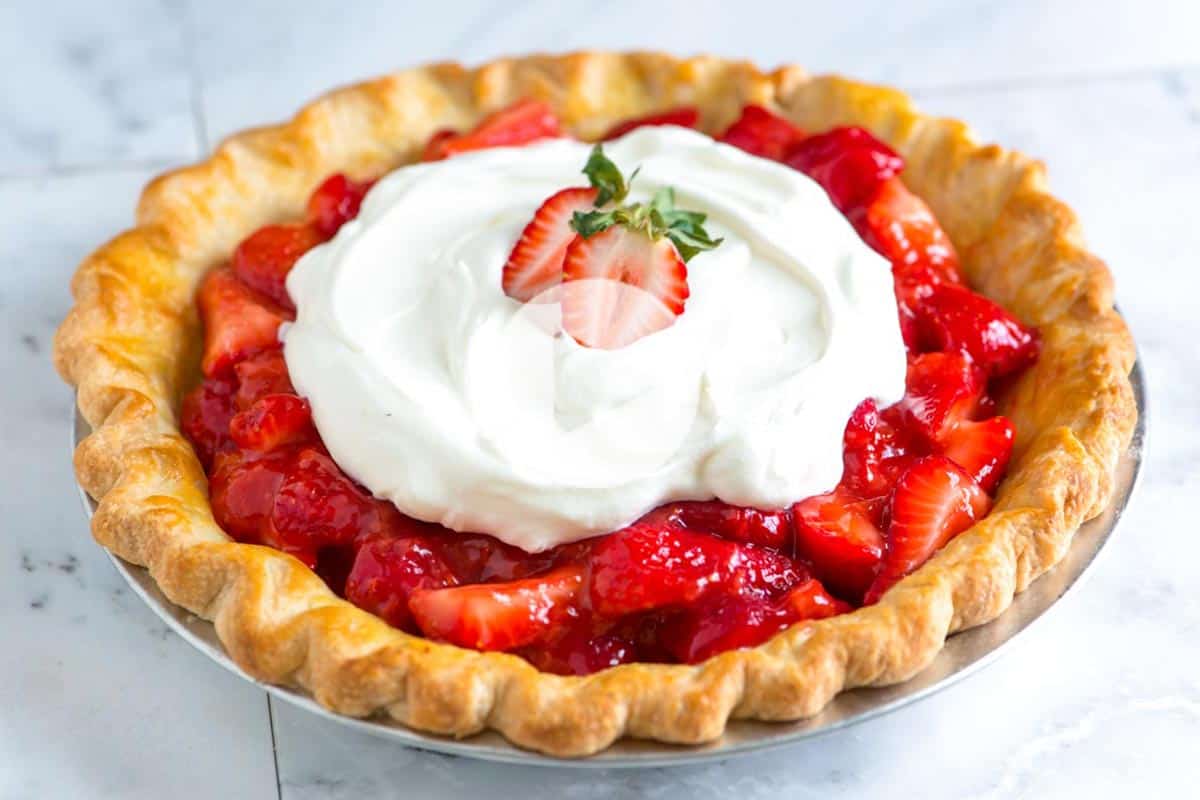
Most of the pie recipes on Inspired Taste call for this butter pie crust recipe. It works wonders for fruit pies like homemade blueberry pie, my best apple pie, and this cherry pie. I also love it for this fresh strawberry pie, which uses pre-baked pie crust for the base, fresh strawberries, and whipped cream.
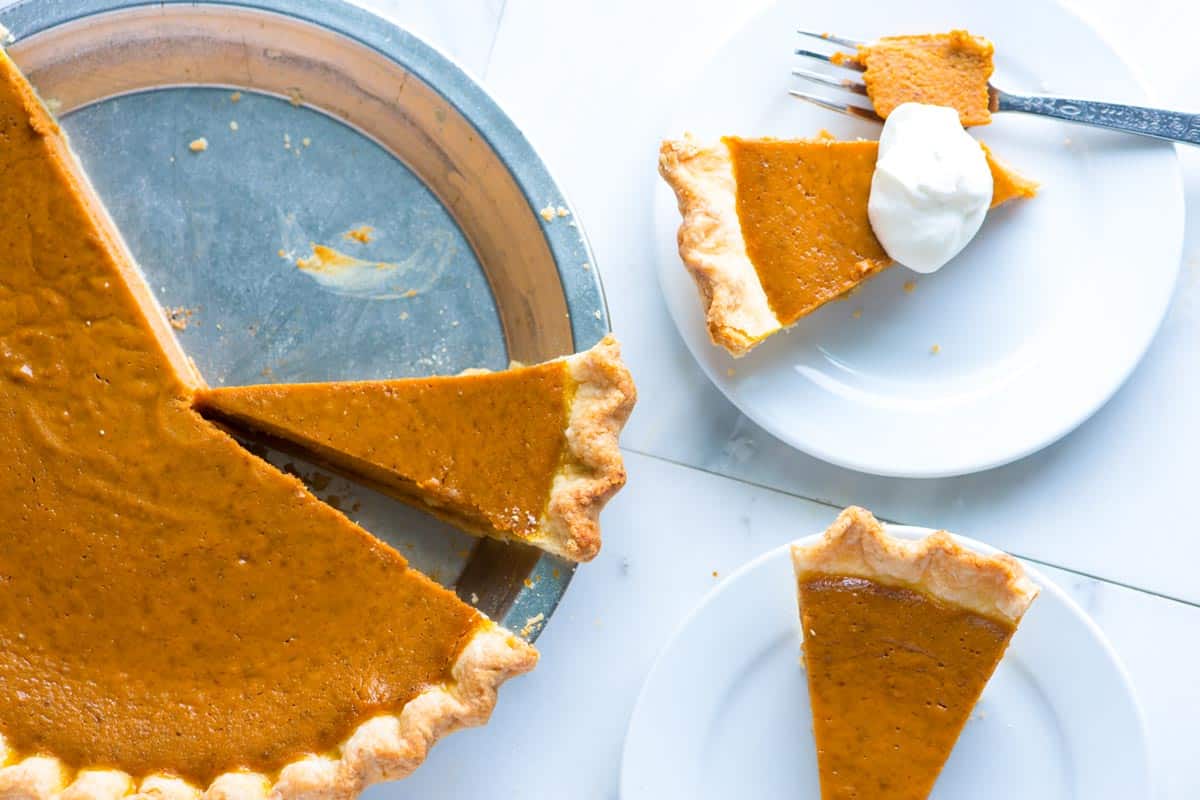
I also love it for custard pies like these holiday staples: easy pumpkin pie and perfect sweet potato pie. Finally, you can use it for free-form pies like my easy apple tart.
Easy Flaky Butter Pie Crust
- PREP
- TOTAL
Of all the pie crust recipes we have tried, this makes the most consistent dough. It’s also a dream to roll out. Using a food processor in this recipe eliminates variability. If you have one, use it. With that said, you can do this method by hand. Directions are provided below for using a processor and by hand.
When measuring the flour for this pie crust, either weigh it or use the “spoon and level” method: Fluff the flour, spoon it into the measuring cup, and level off the top with a flat edge. You can see me do this in our video!
Watch Us Make the Recipe
You Will Need
2 ½ cups (325g) all-purpose flour, spooned and leveled
1 teaspoon kosher salt or 1/2 teaspoon fine sea salt
1 tablespoon sugar, optional
1 cup (230g) very cold unsalted butter, cut into 1/2-inch cubes
6 to 8 tablespoons ice water, or more as needed
Directions
- Method When Using Food Processor
1Add 1 ½ cups flour, salt, and sugar to a food processor. Pulse 2 to 3 times until combined. The remaining cup of flour will be added later.
2Scatter butter cubes over flour and process until a dough or paste begins to form, about 15 seconds. (There should be no uncoated flour).
3Scrape bowl, redistribute the flour-butter mixture then add remaining 1 cup of flour. Pulse 4 to 5 times until flour is evenly distributed. (Dough should look broken up and a little crumbly, see video for reference).
4Transfer to a medium bowl then sprinkle ice water over mixture — start with 4 tablespoons and add from there. Using a rubber spatula, press the dough into itself. The crumbs should begin to form larger clusters. If you pinch some of the dough and it holds together, it’s ready. If the dough falls apart, add 2 to 4 more tablespoons of water and continue to press until dough comes together.
5Remove dough from bowl and place in a mound on a clean surface. Work the dough just enough to form a ball. Cut the ball in half then form each half into disks. Wrap each disk with plastic wrap and refrigerate for at least 1 hour and up to 2 days. You can also freeze it for up to 3 months (just thaw it overnight in the fridge before using it).
- Method When Making By Hand
1Add 1 ½ cups flour, salt, and sugar to a medium bowl. Stir 2 to 3 times until combined.
2Scatter butter cubes over flour and mix briefly with a fork or spatula to coat the butter with flour.
3Cut the butter into the flour with a pastry blender, working mixture until the flour has a coarse, mealy texture similar to fresh bread crumbs. About 1 to 2 minutes.
4Add remaining 1 cup of flour. Work butter and flour with the pastry blender until flour is evenly distributed. About 20 seconds. (Dough should look crumbly with pea-sized pieces, see video for reference).
5Sprinkle ice water over the mixture — start with 4 tablespoons and add from there. Using a rubber spatula, press the dough into itself. The crumbs should begin to form larger clusters. If you pinch some of the dough and it holds together, it’s ready. If the dough falls apart, add 2 to 4 more tablespoons of water and continue to press until dough comes together.
6Remove dough from bowl and place in a mound on a clean surface. Work the dough just enough to form a ball. Cut ball in half then form each half into disks. Wrap each disk with plastic wrap and refrigerate at least 1 hour, and up to 2 days. You can also freeze it for up to 3 months (just thaw it overnight in the fridge before using).
- Rolling Out Dough
1Remove one of the dough disks from the refrigerator and let sit at room temperature for 5 minutes or more as needed. (Dough straight from the refrigerator can be stiff, making it hard to roll out. Leave it on the counter for a few minutes to warm up slightly, then try rolling it out again.)
2Lightly flour work surface, top of dough and rolling pin. Then use rolling pin to roll out dough to a 12-inch circle (about 1/8-inch thick). Be sure to check if the dough is sticking to the surface below — add a small amount of flour when necessary.
3Check for size by inverting pie dish over dough round. Look for a 1-inch edge around the pie dish. To transfer dough to dish, starting at one end, roll dough around rolling pin then unroll over dish.
4Gently press dough down into dish so that it lines the bottom and sides of the dish. (Be careful not to pull or stretch the dough). Then, use a knife or pair of kitchen scissors to trim dough to within 1/2-inch of the edge of the dish.
5Fold edge of dough underneath itself so that it creates a thicker, 1/4-inch border that rests on the lip of the dish. Then, crimp edges by pressing the pointer finger of one hand against the edge of the dough from the inside of the dish while gently pressing with two knuckles of the other hand from the outside. Refrigerate dough at least 20 minutes or freeze for 5 minutes before baking.
6If making a double crust pie, do not crimp edges yet. Roll out second dough disk, fill pie then top with second dough round. Trim the edges then crimp.
- How to Blind Bake a Crust for a Single-Crust Pie (quiches & cream pies)
1Heat the oven to 425°F (218°C). Place a baking sheet on a middle oven rack.
2Roll out enough dough to make one 9-inch crust (1 dough disk). Place into a pie plate and then pierce the bottom of the crust with a fork (this prevent air pockets or bubbles from forming while baking). Line the crust with two sheets of aluminum foil or parchment paper. (Be sure to push foil against the edges of the crust). Then, fill foil with dried rice, dried beans or pie weights. Refrigerate 30 minutes or freeze for 10 minutes, or until firm to the touch.
3Place pie crust onto preheated baking sheet and reduce oven temperature to 400°F (204°C). For a fully baked crust, bake 20 to 30 minutes or until the crust is golden. For a partially-baked crust (a crust that will be baked again, like a quiche), bake until the bottom crust is just beginning to brown, 5 to 10 minutes.
4To add a shiny exterior to fully baked crust, make an egg wash by whisking one egg yolk and 1 tablespoon of cream in a small bowl. Then, remove rice, beans or pie weights and foil from pie crust. Brush the bottom and sides of the crust with egg wash. Bake until egg wash is dry and shiny, 3 to 5 minutes. Cool crust completely before filling.
- How to Make a Double Crust Pie
1Oven temperature and bake time for double crust pies will vary depending on the pie recipe you plan to follow. As an example, we set our oven to 400° Fahrenheit for our double crust cherry pie (see the cherry pie recipe).
2Remove half of dough from refrigerator and let sit at room temperature for 5 minutes. On a lightly floured surface, roll out dough to a 13-inch (1/8-inch thick) circle.
3Check for size by inverting pie dish over dough round. Look for a 1-inch edge around the pie dish. Carefully press the dough into the dish. Spoon the pie filling into pie crust.
4Roll out second half of dough then top pie. Use a knife or pair of kitchen scissors to trim dough to within 3/4-inch of the edge of the dish.
5Fold edges of top crust underneath edges of bottom crust, pressing the edge to seal it so that it creates a thicker, 1/4-inch border that rests on the lip of the dish. Then, crimp edges by pressing the pointer finger of one hand against the edge of the dough from the inside of the dish while gently pressing with two knuckles of the other hand from the outside. Refrigerate pie at least 20 minutes or freeze for 5 minutes before baking.
6Just before baking, make egg wash by whisking egg yolk and cream together in a small bowl. Use a pastry brush to brush over the top crust. Then, sprinkle with 1 tablespoon of sugar. Then, cut 3 to 4 slits in top of pie. Bake as directed by the specific recipe you are following.
Adam and Joanne's Tips
- Storing pie crust: Wrap well with plastic wrap and keep in the fridge for up to 3 days. You can also place the wrapped dough into a freezer bag and freeze for up to 3 months. Thaw frozen dough in the fridge overnight before using.
- Recipe inspired by this easy pie dough. The method for creating the flour paste is inspired by Cooks Illustrated and Kenji López-Alt. Their original recipe also includes vodka, but we do not add this ingredient.
- The nutrition facts provided below are estimates.


Finally! I have been looking for an all butter pie crust that is easy to get together and work with, as well as delicious. I just made a rhubarb pie with it and I can’t get over how flaky it is.
Thank you so much.
This is an excellent crust recipe! …and I don’t say this lightly. I think the secret is premixing some of the flour and butter.
Amazing pie crust. I left the sugar out because I was making a savory crust for a chicken pot pie. It was so perfectly crisp and beautiful butter flavor. Perfect flavor and texture profiles. This one is going in my recipe index. I will add sugar when I make a sweet pie. Thank you for the recipe!
I found your recipe for pie crust as I wanted to make my quiche and found store bought crusts have gotten too expensive. I was amazed at how easy your recipe was to follow and as I sit here eating a slice of quiche I wanted to thank you. Flakey and so good. I’ll be using your recipe from now on.
I have tried – without success – to make pie crust dozens of times. They’ve all been failures. I am beyond thrilled that I have finally found a crust recipe that works perfectly every single time. This is, without a doubt, the easiest and best pie crust I’ve ever made. I’ve started making several batches at a time and storing them in the freezer to pull out whenever I need to whip up a pie, hand pies, etc. This works every time. Thank you SO much!!!!
I have been making this crust recipe for a while now and it’s amazing! I had never attempted making homemade pie crust before.. I was always very intimidated. I knocked it OUT of the park the first time with your recipe. It has very simple ingredients and it’s flaky and buttery. It’s absolutely delicious. I will never buy store bought crust again. I have passed this video on to friends and family and they have all had great results. This crust has elevated my homemade chicken pot pie. I make pot pies for my friends that have been in the hospital or have been sick and have also made this for neighbors that have lost family members. I get raves about how good it is and I know it’s because of your crust recipe. Thank you!
What a wonderful review!! We are thrilled that you and you friends love the recipe and find the video useful! 🙂
We just used this recipe and love it! its a keeper for both sweet and savoury recipies.
Any thoughts on Irish Butter , which is always salted. Its what I always have on hand. I rarely buy unsalted Butter. I’ve used it with no discernible taste difference.,in cookies and always a rich butter fat flavor. Some say cut back additional salt , others say it doesn’t really make much of a difference. Your thoughts
I use Kerrygold butter all the time in this recipe and love it. If you are used to salted butter in most baked goods, I’d just go ahead and use it without any changes. If you are concerned, 1 stick (113g) salted butter usually has about 1/4 tsp salt.
This is the exact pie crust I have been making since I was a little girl (and that’s a long time). It was from a small pamphlet style booklet called “Pies Men Like” which was printed in the 50’s! Could you tell my why the bottom of my pie crust is sometimes soggy even though I don’t change anything about my method of preparation or cooking times?
Hi Patrice, It may be your pie plate. I LOVE metal pie dishes like the one I use in my apple pie. I think they create the best crisp crust on the bottom. It also could be different fillings. If one is more wet, you may have a harder time getting that really crisp, flaky crust.
Here’s my all star tip, straight from my mother: oatmeal! Before you put in your fruit filling, put a thin layer of quick oats (or whatever you have, doesn’t matter) on the bottom of the pie crust. It will absorb all the juices, keep the filling texture the same, AND prevent a soggy bottom crust. Keep this tip a secret!
Hi Julia, This is such an interesting tip! I’ve never tried this, but I’m so curious. Thanks for sharing!!
I’ve lived 7 decades and fought with pie dough all my life. Until now. This pie crust is amazing! So flaky and delicious! But the best part was the video showing the instructions. I’m going to credit using the food processor and the technique of moving the dough and rolling it around the rolling pin with my love of this recipe. No more tearing dough while transferring the dough to the pie plate. I’m looking forward to making pies now. I used to see pie eaten down to the crust because it was tough but not this time! My family loved the taste of the crust! Thank you Inspired Taste!
Wow Cindy, Thank you for your thoughtful comment! I am so happy that you found us and that we were helpful!
Question, not a review, how would you cut down the recipe for a one crust pie.
Cut the recipe by half.
What attachment do you use for food processor? Dough one?
I use the regular blade attachment.
I have a question about the flour you use. I use King Arthur AP, and it shows that 1/4 cup is 30g = 120g per cup. So 2.5 cups is 300g. This recipe lists the weight equivalent as 325 grams. How sensitive is this recipe to flour content?
Hi Greg, For our recipes on Inspired Taste, use 130g for 1 cup flour. I actually have a hard time getting 1 cup of flour to weigh 120g. I’ve tried many times, and unless the flour is very well fluffed in the container, I don’t ever get a cup to weight that little. After many tests (scooping and weighing), we come to 130g the most often. You will see different weights for 1 cup of flour across different recipe sites (Cook Illustrated is even higher than us). I hope that helps and you should feel confident that our measurements in grams have all been tested.
This pie crust recipe is the best! I’ve been looking for a while and this is a keeper. Taste great and so flaky. Thank you so much!
That’s amazing, thank you for coming back and letting us know!